文章目录[隐藏]
版权声明:本文为博主原创文章,未经博主允许不得转载。 https://blog.csdn.net/sl1992/article/details/79017695
Linux下完整安装weblogic12.1.3通用版本
参见Linux下安装weblogic12.1.3,由于使用wls1213_dev.zip进行安装的weblogic仅用于开发环境,而且不能进行补丁升级。生产环境上要下载安装的是Generic包。
注:Generic通用版本的安装不能使用root用户进行安装
此版本的weblogic至少需要JDK 1.7。
1.下载weblogic
下载weblogic12.1.3版本,选择Generic通用安装包,将下载的fmw_12.1.3.0.0_wls.jar上传到Linux系统
2.准备安装环境
-
配置安装环境
在用户主目录下
vi .bash_profile,这个文件不一定存在,如果存在,就在~/,即~/.bash_profile。但也很可能不存在,这时创建一个空文件,加入自己想要的内容就行。Linux中的配置文件很多都是这样,是要在需要时建立的,而程序在没有这些配置文件时,也可能正常运行。cd ~/ -- 进入用户主目录下 vi .bash_profile -- 修改文件,若没有则是新增export JAVA_HOME=/usr/local/jdk1.7.0_80 export CLASSPATH=.:$JAVA_HOME/lib:$JAVA_HOME/jre/lib export PATH=$JAVA_HOME/bin:$PATHsource .bash_profile使配置立即生效 -
配置主机名和IP的映射
若不配置,会报UnknownHostException
vi /etc/hosts,添加配置项192.168.1.200 cyyun127.0.0.1 localhost localhost.localdomain localhost4 localhost4.localdomain4 ::1 localhost localhost.localdomain localhost6 localhost6.localdomain6 192.168.1.200 cyyun
3.创建oraInst.loc文件
For UNIX users, if this is a first time installation of any Oracle product, you must create the oraInst.loc file before starting.
对于UNIX用户来说,如果这是你第一次安装Oracle的产品,你必须先创建oraInst.loc文件。
参见2.3.1 UNIX Users: Creating the oraInst.loc File
The Oracle inventory directory is used by the installer to keep track of all Oracle products installed on the computer. The inventory directory is stored in a file called oraInst.loc. If this file does not already exist on your system, you must create it before starting a silent installation. This file is used by the installer.
安装程序使用Oracle清单目录来跟踪安装在计算机上的所有Oracle产品。清单目录中存放的文件名为orainst.loc。如果该文件不存在于您的系统上,则必须在启动静默安装之前创建该文件。安装程序使用此文件。The contents of the file consist of the following two lines:
inventory_loc=oui_inventory_directory
inst_group=oui_install_group
Replace oui_inventory_directory with the full path to the directory where you want the installer to create the inventory directory. Then, replace oui_install_group with the name of the group whose members have write permissions to this directory.
用你想要安装程序创建清单目录的完整路径目录替换oui_inventory_directory。然后,用其成员有这个目录的写权限的组的名称替换oui_install_group。
vi oraInst.loc

inventory_loc=/usr/local/products/oraInventory
inst_group=cyyun
4.创建响应文件wls.rsp
参见C.1.2 Sample Response File for Oracle WebLogic Server and Coherence Installation,此处只修改ORACLE_HOME的路径,即WebLogic Server的安装路径
vi wls.rsp

[ENGINE]

#DO NOT CHANGE THIS.
Response File Version=1.0.0.0.0

[GENERIC]

#The oracle home location. This can be an existing Oracle Home or a new Oracle Home
ORACLE_HOME=/usr/local/products/weblogic12c

#Set this variable value to the Installation Type selected. e.g. WebLogic Server, Coherence, Complete with Examples.
INSTALL_TYPE=WebLogic Server

#Provide the My Oracle Support Username. If you wish to ignore Oracle Configuration Manager configuration provide empty string for user name.
MYORACLESUPPORT_USERNAME=

#Provide the My Oracle Support Password
MYORACLESUPPORT_PASSWORD=<SECURE VALUE>

#Set this to true if you wish to decline the security updates. Setting this to true and providing empty string for My Oracle Support username will ignore the Oracle Configuration Manager configuration
DECLINE_SECURITY_UPDATES=true

#Set this to true if My Oracle Support Password is specified
SECURITY_UPDATES_VIA_MYORACLESUPPORT=false

#Provide the Proxy Host
PROXY_HOST=

#Provide the Proxy Port
PROXY_PORT=

#Provide the Proxy Username
PROXY_USER=

#Provide the Proxy Password
PROXY_PWD=<SECURE VALUE>

#Type String (URL format) Indicates the OCM Repeater URL which should be of the format [scheme[Http/Https]]://[repeater host]:[repeater port]
COLLECTOR_SUPPORTHUB_URL=
5.执行安装
执行命令java -jar /home/cyyun/fmw_12.1.3.0.0_wls.jar -silent -responseFile /home/cyyun/wls.rsp -invPtrLoc /home/cyyun/oraInst.loc
此处如果用root用户执行会出现OUI不能继续安装的问题
Launcher log file is /tmp/OraInstall2018-01-09_12-42-43AM/launcher2018-01-09_12-42-43AM.log.
Extracting files..............................
The current user is root or has superuser privilege.
The Oracle Universal Installer cannot continue installation.
java -jar /home/cyyun/fmw_12.1.3.0.0_wls.jar -silent -responseFile /home/cyyun/wls.rsp -invPtrLoc /home/cyyun/oraInst.loc
Launcher log file is /tmp/OraInstall2018-01-09_01-04-50AM/launcher2018-01-09_01-04-50AM.log.
Extracting files...............................
Starting Oracle Universal Installer
Checking if CPU speed is above 300 MHz. Actual 2594.149 MHz Passed
Checking swap space: must be greater than 512 MB. Actual 2097144 MB Passed
Checking if this platform requires a 64-bit JVM. Actual 64 Passed (64-bit not required)
Checking temp space: must be greater than 300 MB. Actual 7085 MB Passed
Preparing to launch the Oracle Universal Installer from /tmp/OraInstall2018-01-09_01-04-50AM
Log: /tmp/OraInstall2018-01-09_01-04-50AM/install2018-01-09_01-04-50AM.log
Copyright (c) 1996, 2014, Oracle and/or its affiliates. All rights reserved.
Reading response file..
Starting check : CertifiedVersions
Expected result: One of enterprise-4,enterprise-5,enterprise-6,redhat-6,redhat-4,redhat-5,SuSE-11
Actual Result: enterprise-6
Check complete. The overall result of this check is: Passed
CertifiedVersions Check: Success.
Starting check : CheckJDKVersion
Expected result: 1.7.0_15
Actual Result: 1.7.0_80
Check complete. The overall result of this check is: Passed
CheckJDKVersion Check: Success.
Validations are enabled for this session.
Verifying data......
Copying Files...
You can find the log of this install session at:
/tmp/OraInstall2018-01-09_01-04-50AM/install2018-01-09_01-04-50AM.log
-----------20%----------40%----------60%----------80%--------100%
The installation of Oracle Fusion Middleware 12c WebLogic Server and Coherence 12.1.3.0.0 completed successfully.
Logs successfully copied to /usr/local/products/oraInventory/logs.6.配置环境变量
vi .bash_profile

export MW_HOME=/usr/local/products/weblogic12c
source .bash_profile使配置立即生效
7.创建域,控制台启动慢问题
现象:
1. 创建域的时候writeDomain需要很长时间(20分钟左右)
2. 启动weblogic第一次进入控制台需要很长时间(10分钟左右)
3. 启动weblogic server需要很长时间(5-10分钟)
修改:
在创建域之前,先修改Linux下的Java生成随机数
cd $JAVA_HOME/jre/lib/security
vi java.security

# securerandom.source=file:/dev/urandom
# 修改为
# securerandom.source=file:/dev/./urandom
8.创建Domain/域
mkdir /usr/local/products/domain    -- 创建域存放目录
cd $MW_HOME/wlserver/common/bin
./commEnv.sh
./wlst.sh

Initializing WebLogic Scripting Tool (WLST) ...

Jython scans all the jar files it can find at first startup. Depending on the system, this process may
take a few minutes to complete, and WLST may not return a prompt right away.

Welcome to WebLogic Server Administration Scripting Shell

Type help() for help on available commands

wls:/offline>


wls:/offline> readTemplate('/usr/local/products/weblogic12c/wlserver/common/templates/wls/wls.jar')
wls:/offline/base_domain>cd('Servers/AdminServer')
wls:/offline/base_domain/Server/AdminServer>set('ListenAddress','')
wls:/offline/base_domain/Server/AdminServer>set('ListenPort', 7001)
wls:/offline/base_domain/Server/AdminServer>cd('/')
wls:/offline/base_domain>cd('Security/base_domain/User/weblogic')
wls:/offline/base_domain/Security/base_domain/User/weblogic>cmo.setPassword('weblogic12c')
wls:/offline/base_domain/Security/base_domain/User/weblogic>setOption('OverwriteDomain', 'true')
wls:/offline/base_domain/Security/base_domain/User/weblogic>writeDomain('/usr/local/products/domain')
wls:/offline/domain/Security/domain/User/weblogic>closeTemplate()
wls:/offline>exit()


Exiting WebLogic Scripting Tool.
9.启动weblogic
cd /usr/local/products/domain/bin/    -- 进入创建的域目录bin下
./startWebLogic.sh    -- 后台启动使用nohup ./startWebLogic.sh &
./stopWeblogic.sh -- 关闭weblogic启动浏览器访问weblogic控制台http://IP:7001/console,用户名默认是weblogic,密码是创建域时设置的。
①第一次访问控制台显示下面的界面,等一会或刷新进入到控制台登录界面 
②登录到WebLogic控制台后,启用域配置锁定
启用和禁用域配置锁定
管理控制台更改中心提供了锁定域配置的方法,使您可以在更改配置的同时,阻止其他帐户在您进行编辑会话期间执行更改。
在生产域中,会始终启用域配置锁定功能。而在开发域中,可以启用此功能,也可以禁用此功能。在创建新开发域时,会默认禁用此功能。
要在开发域中启用或禁用域配置锁定功能,请执行以下操作:
1. 在控制台右侧窗格顶部的标帜工具栏区域中,单击首选项。
2. 选择用户首选项。
3. 选中或者清除自动获取锁并激活更改复选框以便启用或禁用该功能。
4. 单击保存。
完成后
如果启用域配置锁定,则必须使用更改中心锁定并编辑域配置。请参阅使用更改中心。
1.单击首选项 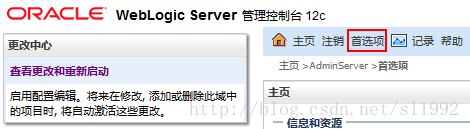
2.选择用户首选项,取消勾选自动获取锁并激活更改 
3.点击保存更新成功,更改中心变化 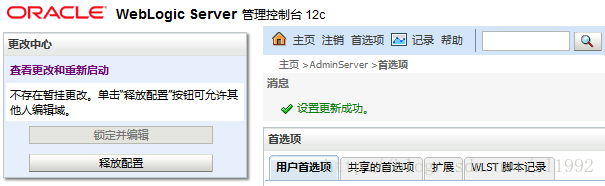
10.新建server启动
应用默认运行在AdminServer中,可在控制台新建server,比如名为cyyunServer
①选择环境-服务器,点击新建 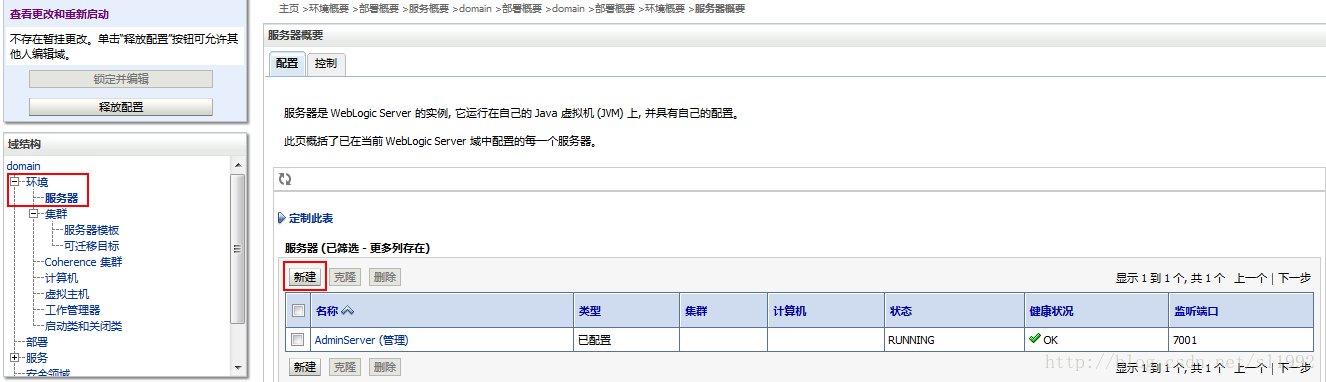
②输入服务器名称,服务器监听端口,点击完成 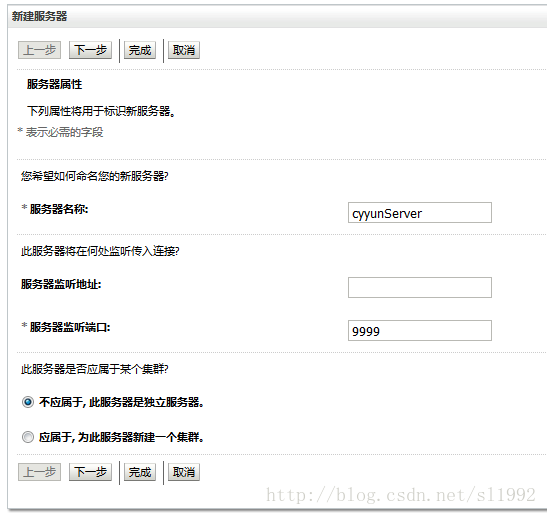
③点击激活更改 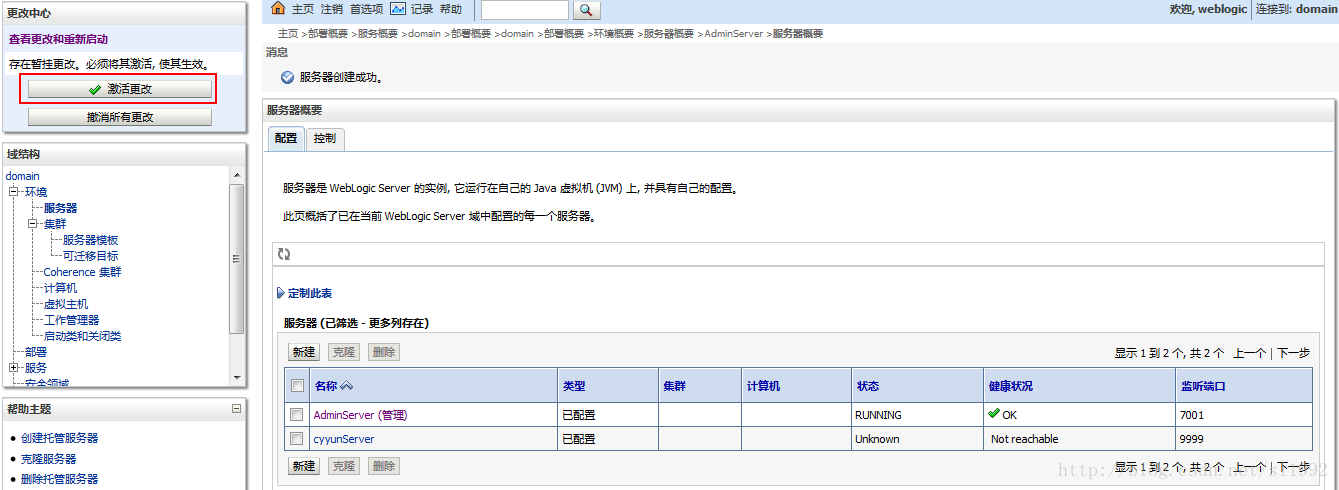
④server创建完成 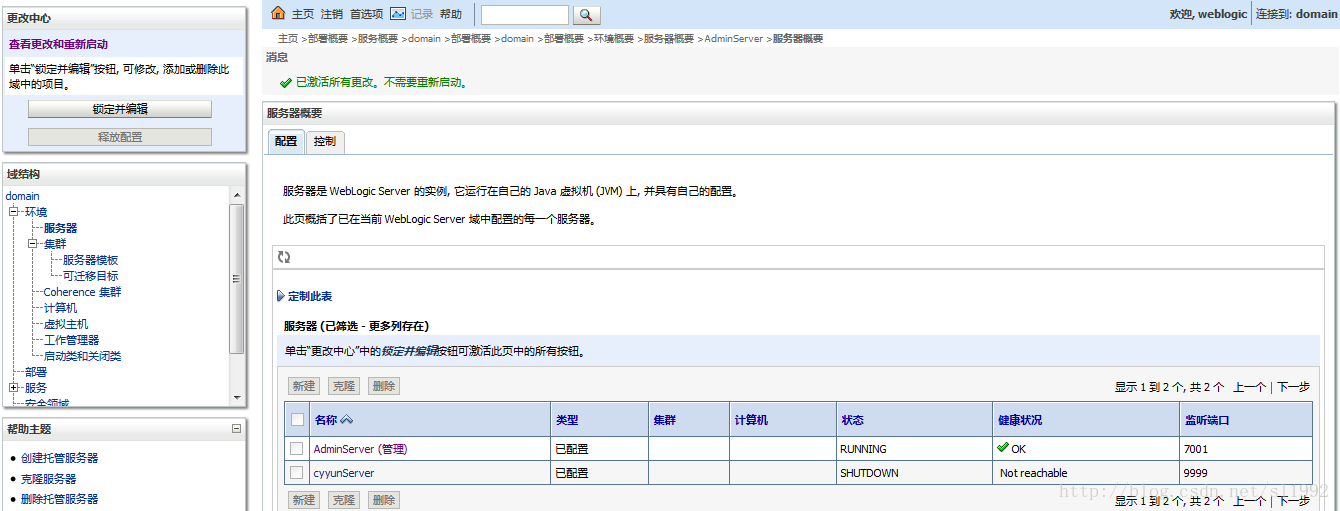
⑤启动server
命令行启动cyyunServer,用startManagedServer命令startManagedServer <server名> <控制台的地址+端口>
cd /usr/local/products/domain/bin
./startManagedWebLogic.sh cyyunServer http://localhost:7001
输入weblogic的用户名和密码启动server
⑥刷新控制台页面cyyunServer显示启动成功 
11.不输入用户名密码启动server
启动weblogic server需要在控制台输入用户名和密码,不方便后台启动
cd /usr/local/products/domain/servers/cyyunServer
mkdir security
cd security
vi boot.properties

# 填入以下内容
username=weblogic
password=weblogic12c

cd /usr/local/products/domain/bin
# 关闭cyyunServer
./stopManagedWebLogic.sh cyyunServer http://localhost:7001
# 重新启动cyyunServer
./startManagedWebLogic.sh cyyunServer http://localhost:7001
# 后台启动
nohup ./startManagedWebLogic.sh cyyunServer http://localhost:7001 &
此时不再需要手动输入用户名和密码,同时不用担心密码会泄漏,启动后Weblogic会对用户名和密码做AES加密。再次打开boot.properties就会显示加密后的内容。
12.开发包安装和通用包安装的区别
1.wls1213_dev.zip开发包安装后目录 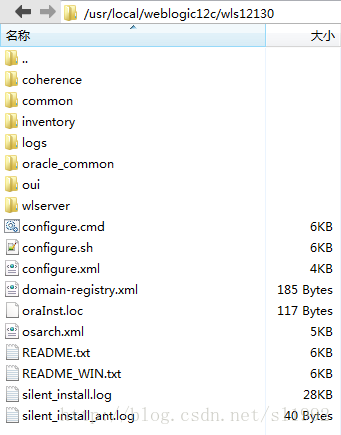
2.fmw_12.1.3.0.0_wls.jar通用包安装后目录 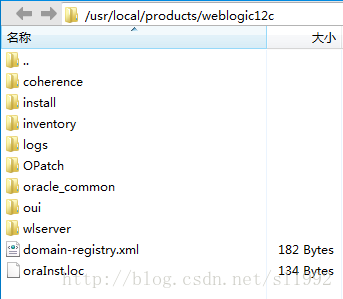
①通用包安装后的目录多了OPatch文件夹,此文件夹可进行weblogic12c的补丁升级
OPatch is a Java-based utility that runs on all supported operating systems and requires installation of the Oracle Universal Installer. It is used to apply patches to Oracle software.
OPatch是一个基于java的程序,可以运行在所有支持的操作系统,需要安装Oracle通用安装程序(即OUI)。它用于向Oracle软件应用补丁程序。
②通用包安装后的目录oui文件夹不为空,开发包安装后的目录oui文件夹为空
本文参考:
https://my.oschina.net/CasparLi/blog/420210
2 Using the Oracle Universal Installer in Silent Mode
本文来源于互联网:Linux命令行安装weblogic12c


2 条评论 “Linux命令行安装weblogic12c”